如题,最近有点无聊,折腾一下,先上成果
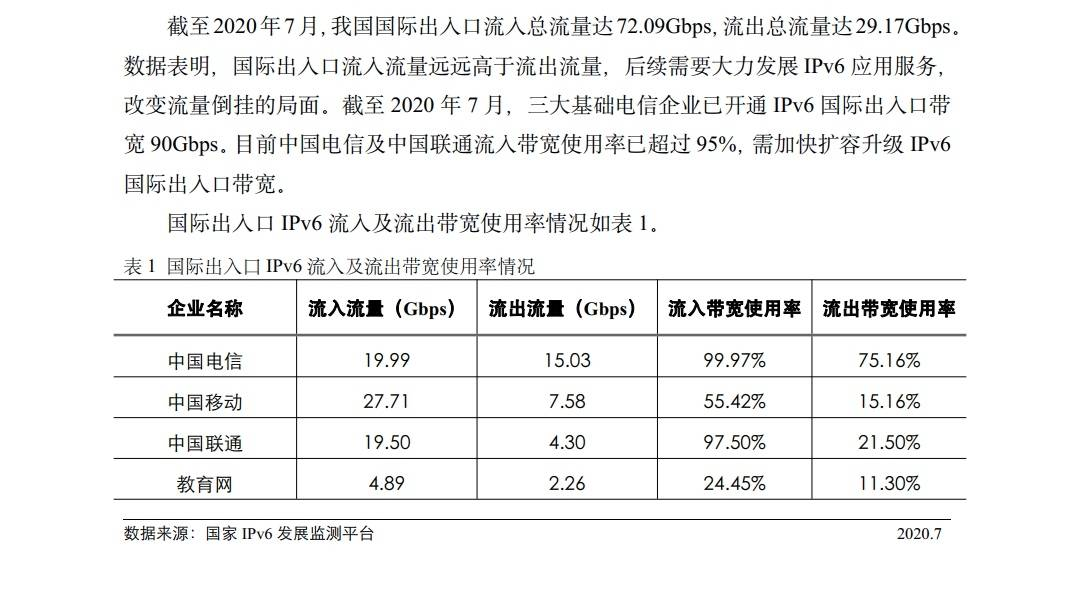
起因,三大运营商出口接近饱和,国际访问体验极差
于是想起了有个东西叫6in4,然后又想起了这东西没加密,然后双想起了匹配到某些sni信息会被阻断6in4 tunnel(憋住别问
顺带叒想起了zerotier可以打成二层组网,所以才有了这篇教程
准备工作
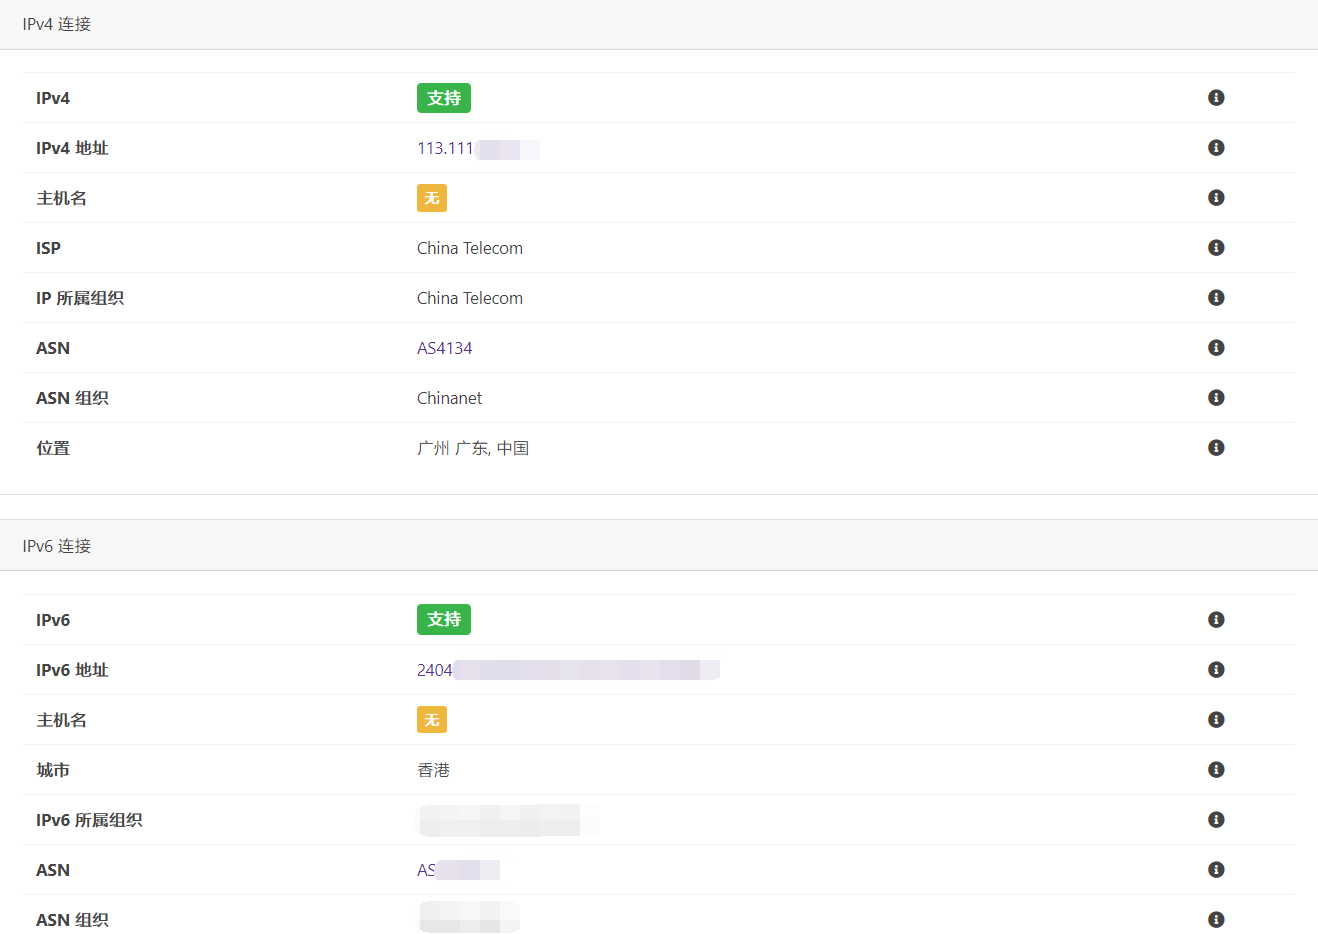
需要一台境外的vps、zerotier账号以及HE IPv6 tunnelbroker(如果vps有/48的IPv6可忽略)本次演示用的是腾讯云的轻量服务器(124.156及101.32),本地运营商为中国电信AS4134
关于选择腾讯轻量的原因是便宜还大碗,质量相对也不错(此处贴出各区情况)
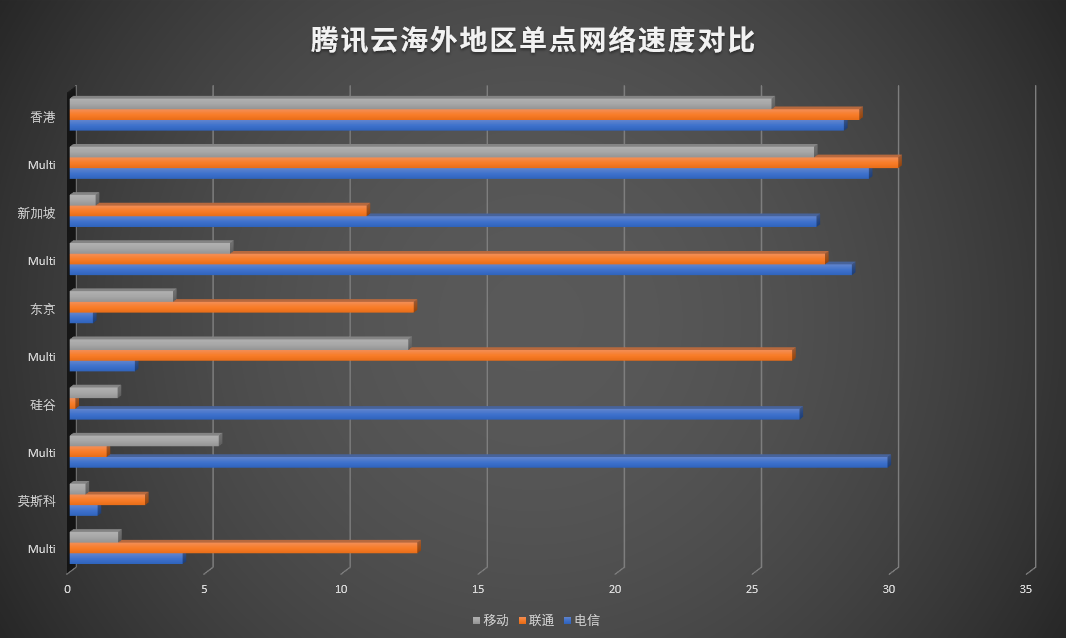
相关评测:https://luotianyi.vc/4706.html 现成的评测那么多直接引用多香啊,懒得自己写了(逃适合自己的vps才是最好的,同时因为zerotier组网的特殊性需要优秀的NAT type以及对udp不能qos得太惨(希望移动没事
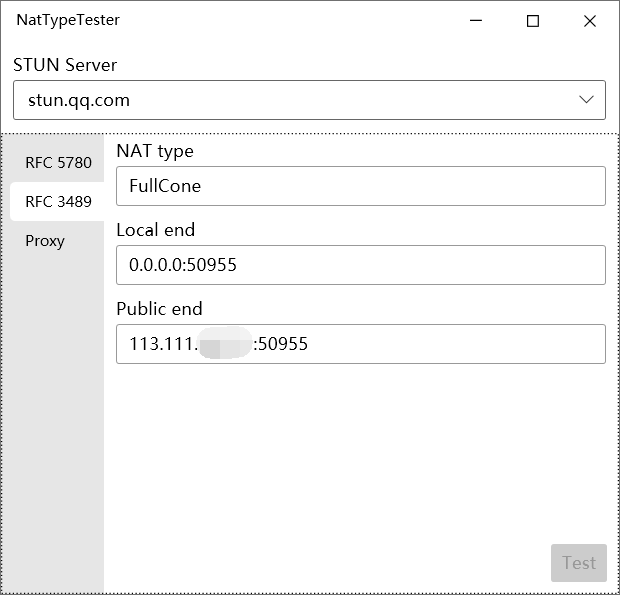
软件地址:https://github.com/HMBSbige/NatTypeTester/releases
GitHub加速:https://github.intel-2333.workers.dev/
①在/etc/sysctl.conf中检查是否添加
net.ipv4.conf.all.forwarding = 1

net.ipv6.conf.all.disable_ipv6 = 0

net.ipv6.conf.default.disable_ipv6 = 0

net.ipv6.conf.lo.disable_ipv6 = 0

net.ipv6.conf.default.forwarding = 1

net.ipv6.conf.all.forwarding = 1

net.ipv6.conf.all.proxy_ndp = 1

net.ipv6.conf.all.accept_ra = 2
添加并确认无误后执行
sysctl -p
②登陆https://tunnelbroker.net/ 并点击Create Regular Tunnel创建隧道在IPv4 Endpoint (Your side)处填入你VPS的IPv4或域名地址地址选择离你VPS最近的地方并检测延迟,此处使用HE的HK接入点
PING 216.218.221.6 (216.218.221.6) 56(84) bytes of data.
64 bytes from 216.218.221.6: icmp_seq=1 ttl=57 time=2.03 ms
64 bytes from 216.218.221.6: icmp_seq=2 ttl=57 time=1.86 ms
64 bytes from 216.218.221.6: icmp_seq=3 ttl=57 time=1.94 ms
64 bytes from 216.218.221.6: icmp_seq=4 ttl=57 time=1.96 ms
64 bytes from 216.218.221.6: icmp_seq=5 ttl=57 time=1.89 ms
64 bytes from 216.218.221.6: icmp_seq=6 ttl=57 time=1.91 ms
64 bytes from 216.218.221.6: icmp_seq=7 ttl=57 time=1.88 ms
64 bytes from 216.218.221.6: icmp_seq=8 ttl=57 time=2.01 ms
64 bytes from 216.218.221.6: icmp_seq=9 ttl=57 time=1.95 ms
确认无误之后即可创建
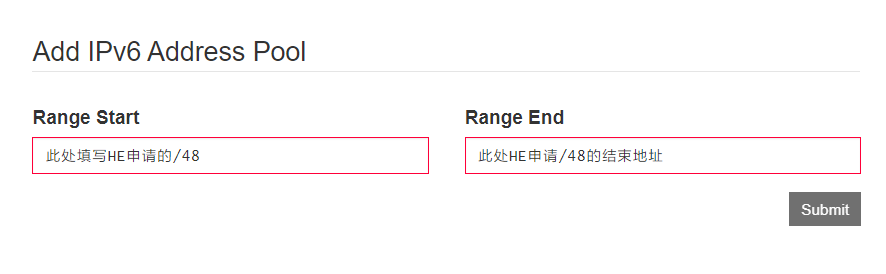
创建完成后点击 Routed /48: 的 Assign /48 申请/48地址并记录(后面要用)
然后打开example configurations并选择你的系统
我是腾讯的轻量,系统是centos7,并无DD,我选择Linux-net-tools(sit tunnel),复制后ssh执行即可
唔,我知道肯定有些人想用route,记得local填写v4 nat地址(输入ip a中的eth0即可找到)
接入完成后
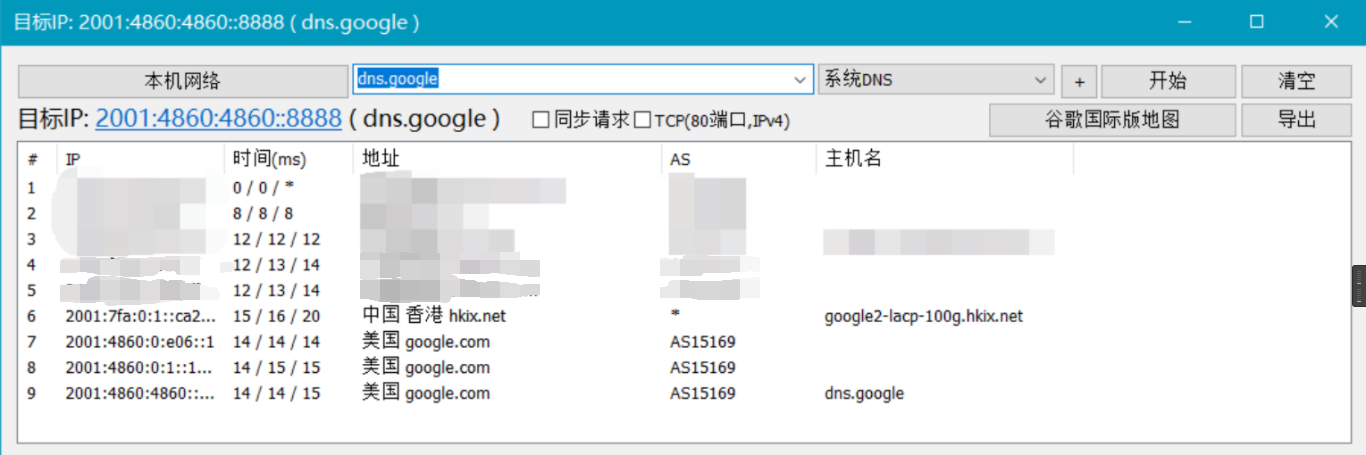
ping dns.google -6
确认是否正常工作
64 bytes from dns.google (2001:4860:4860::8888): icmp_seq=1 ttl=120 time=5.01 ms
64 bytes from dns.google (2001:4860:4860::8888): icmp_seq=3 ttl=120 time=4.72 ms
64 bytes from dns.google (2001:4860:4860::8888): icmp_seq=4 ttl=120 time=4.87 ms
64 bytes from dns.google (2001:4860:4860::8888): icmp_seq=5 ttl=120 time=5.24 ms
64 bytes from dns.google (2001:4860:4860::8888): icmp_seq=6 ttl=120 time=5.33 ms
64 bytes from dns.google (2001:4860:4860::8888): icmp_seq=7 ttl=120 time=4.70 ms
64 bytes from dns.google (2001:4860:4860::8888): icmp_seq=8 ttl=120 time=5.25 ms
64 bytes from dns.google (2001:4860:4860::8888): icmp_seq=9 ttl=120 time=4.71 ms
64 bytes from dns.google (2001:4860:4860::8888): icmp_seq=10 ttl=120 time=4.92 ms
由于重启会失效,建议添加进/etc/rc.local进行开机自启
debian以及ubuntu则添加进
/etc/network/interfaces
并
/etc/init.d/networking restart
再补充一点,如果想在VPS上修改IPv4优先的话需要拉高
::ffff:
权重
具体方法为创建/etc/gai.conf并填入
precedence ::ffff:0:0/96 100
③在vps上安装zerotier
curl -s https://install.zerotier.com/ | sudo bash
安装完成后进入https://my.zerotier.com/创建网络
找到你的Network ID并在VPS上执行
zerotier-cli set 此处替换你自己的ID allowGlobal=true
打勾这里的RFC4193

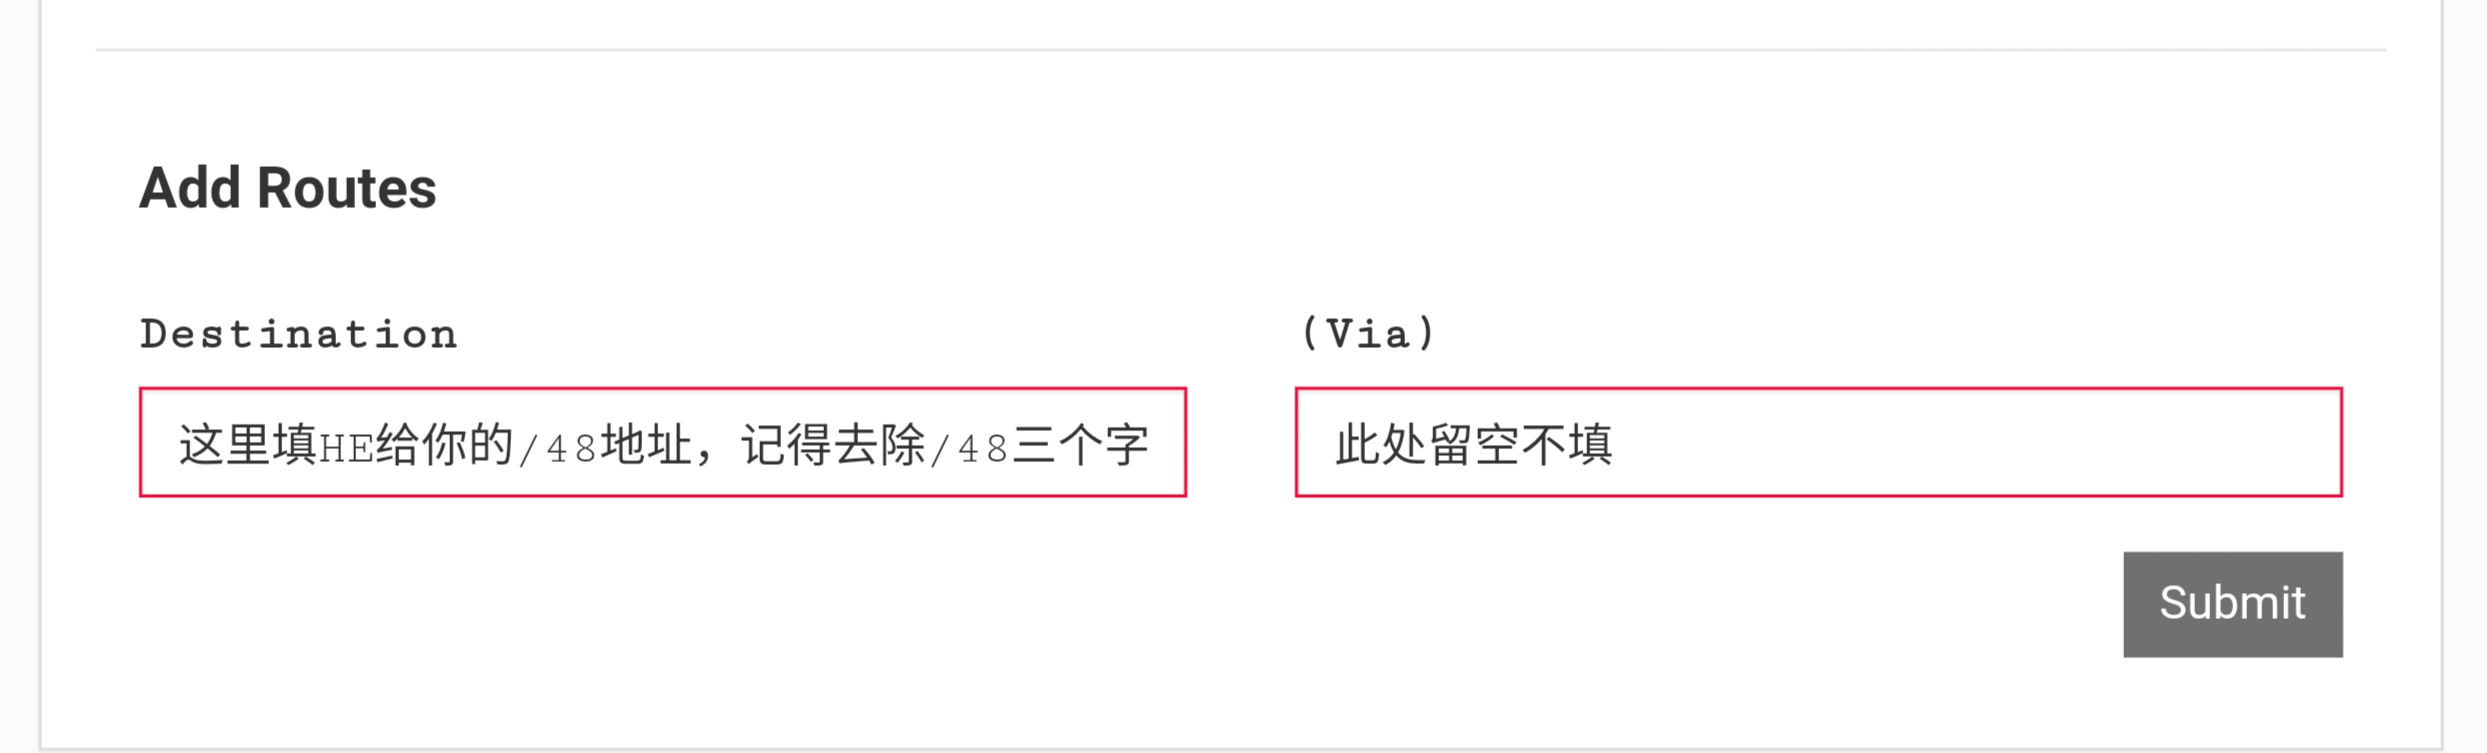
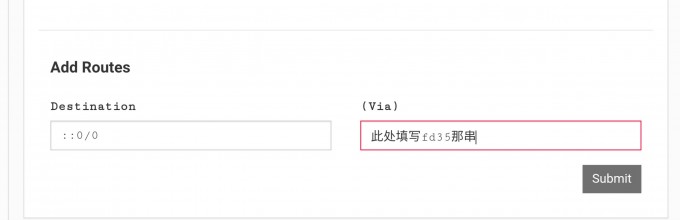
由于是 PRIVATE 网络,你需要手动打勾你自己的VPS并记录fd开头的那串ipv6在 Advanced 的Managed Routes 处添加两个路由并submit,分别是
然后确认其余设置是否如下图一样
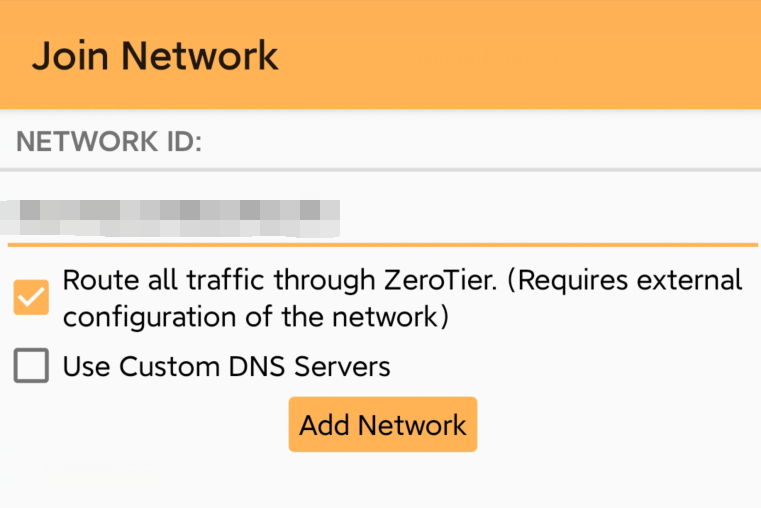
在 https://www.zerotier.com/download/ 下载对应的客户端并入网,同时因为是 PRIVATE 网络需要你手动勾选客户端以手机客户端为例,填入网络ID,勾选
route all traffic though zerotier
并加入网络即可~
因为默认路由的原因,如果本地有ipv6的话记得手动设置zerotier为default或直接关闭v6即可
哦对了,想起件事,腾讯双11的123套餐和挺便宜的,刚需的可以去瞄一眼

写作不易,求大佬们给点回复叭
如文中有什么地方写的不对,请各位大佬指出鸭~
注:移动它没法用这个方法获取IPV6